Instructions
To get started, download the template that's the best fit for the photos and software you have:
Square Template Options:
Horizontal Template Options:
Vertical Template Options:
Anatomy of Field Guide
Please read the guidelines below before inserting your photos and text. As you make your guide, refer to your favorite recent guide as a model.
Field Guide Requirements Checklist
Materials:
1. High-quality photos: Your guide is more likely to be accepted if a) your photos are of high quality, b) the species are recognizable in this small format (the characteristics that define a species should be easy to see in a small photo), and c) you follow our advice on choosing, optimizing, and cropping photographs.
2. Accurate scientific identification: Authors are responsible for having an expert review species identifications and information.
3. Authors may use other visual assets such as diagrams, maps, infographics, environment /landscape images, keys for identification, tables, and text that explains your guide, research, or location. Always indicate the source when available.
Formatting and Layout:
1. Use an 8 1/2 by 11 inches document.
2. Keep the layout in a vertical orientation. (i.e., 8 1/2 by 11 inches, not 11 by 8 1/2 inches)
3. Apply only one font to your field guide. Please choose one from the following: Arial, Times New Roman, or Times.
4. Apply even spacing between photos.
Field Guide by Sections
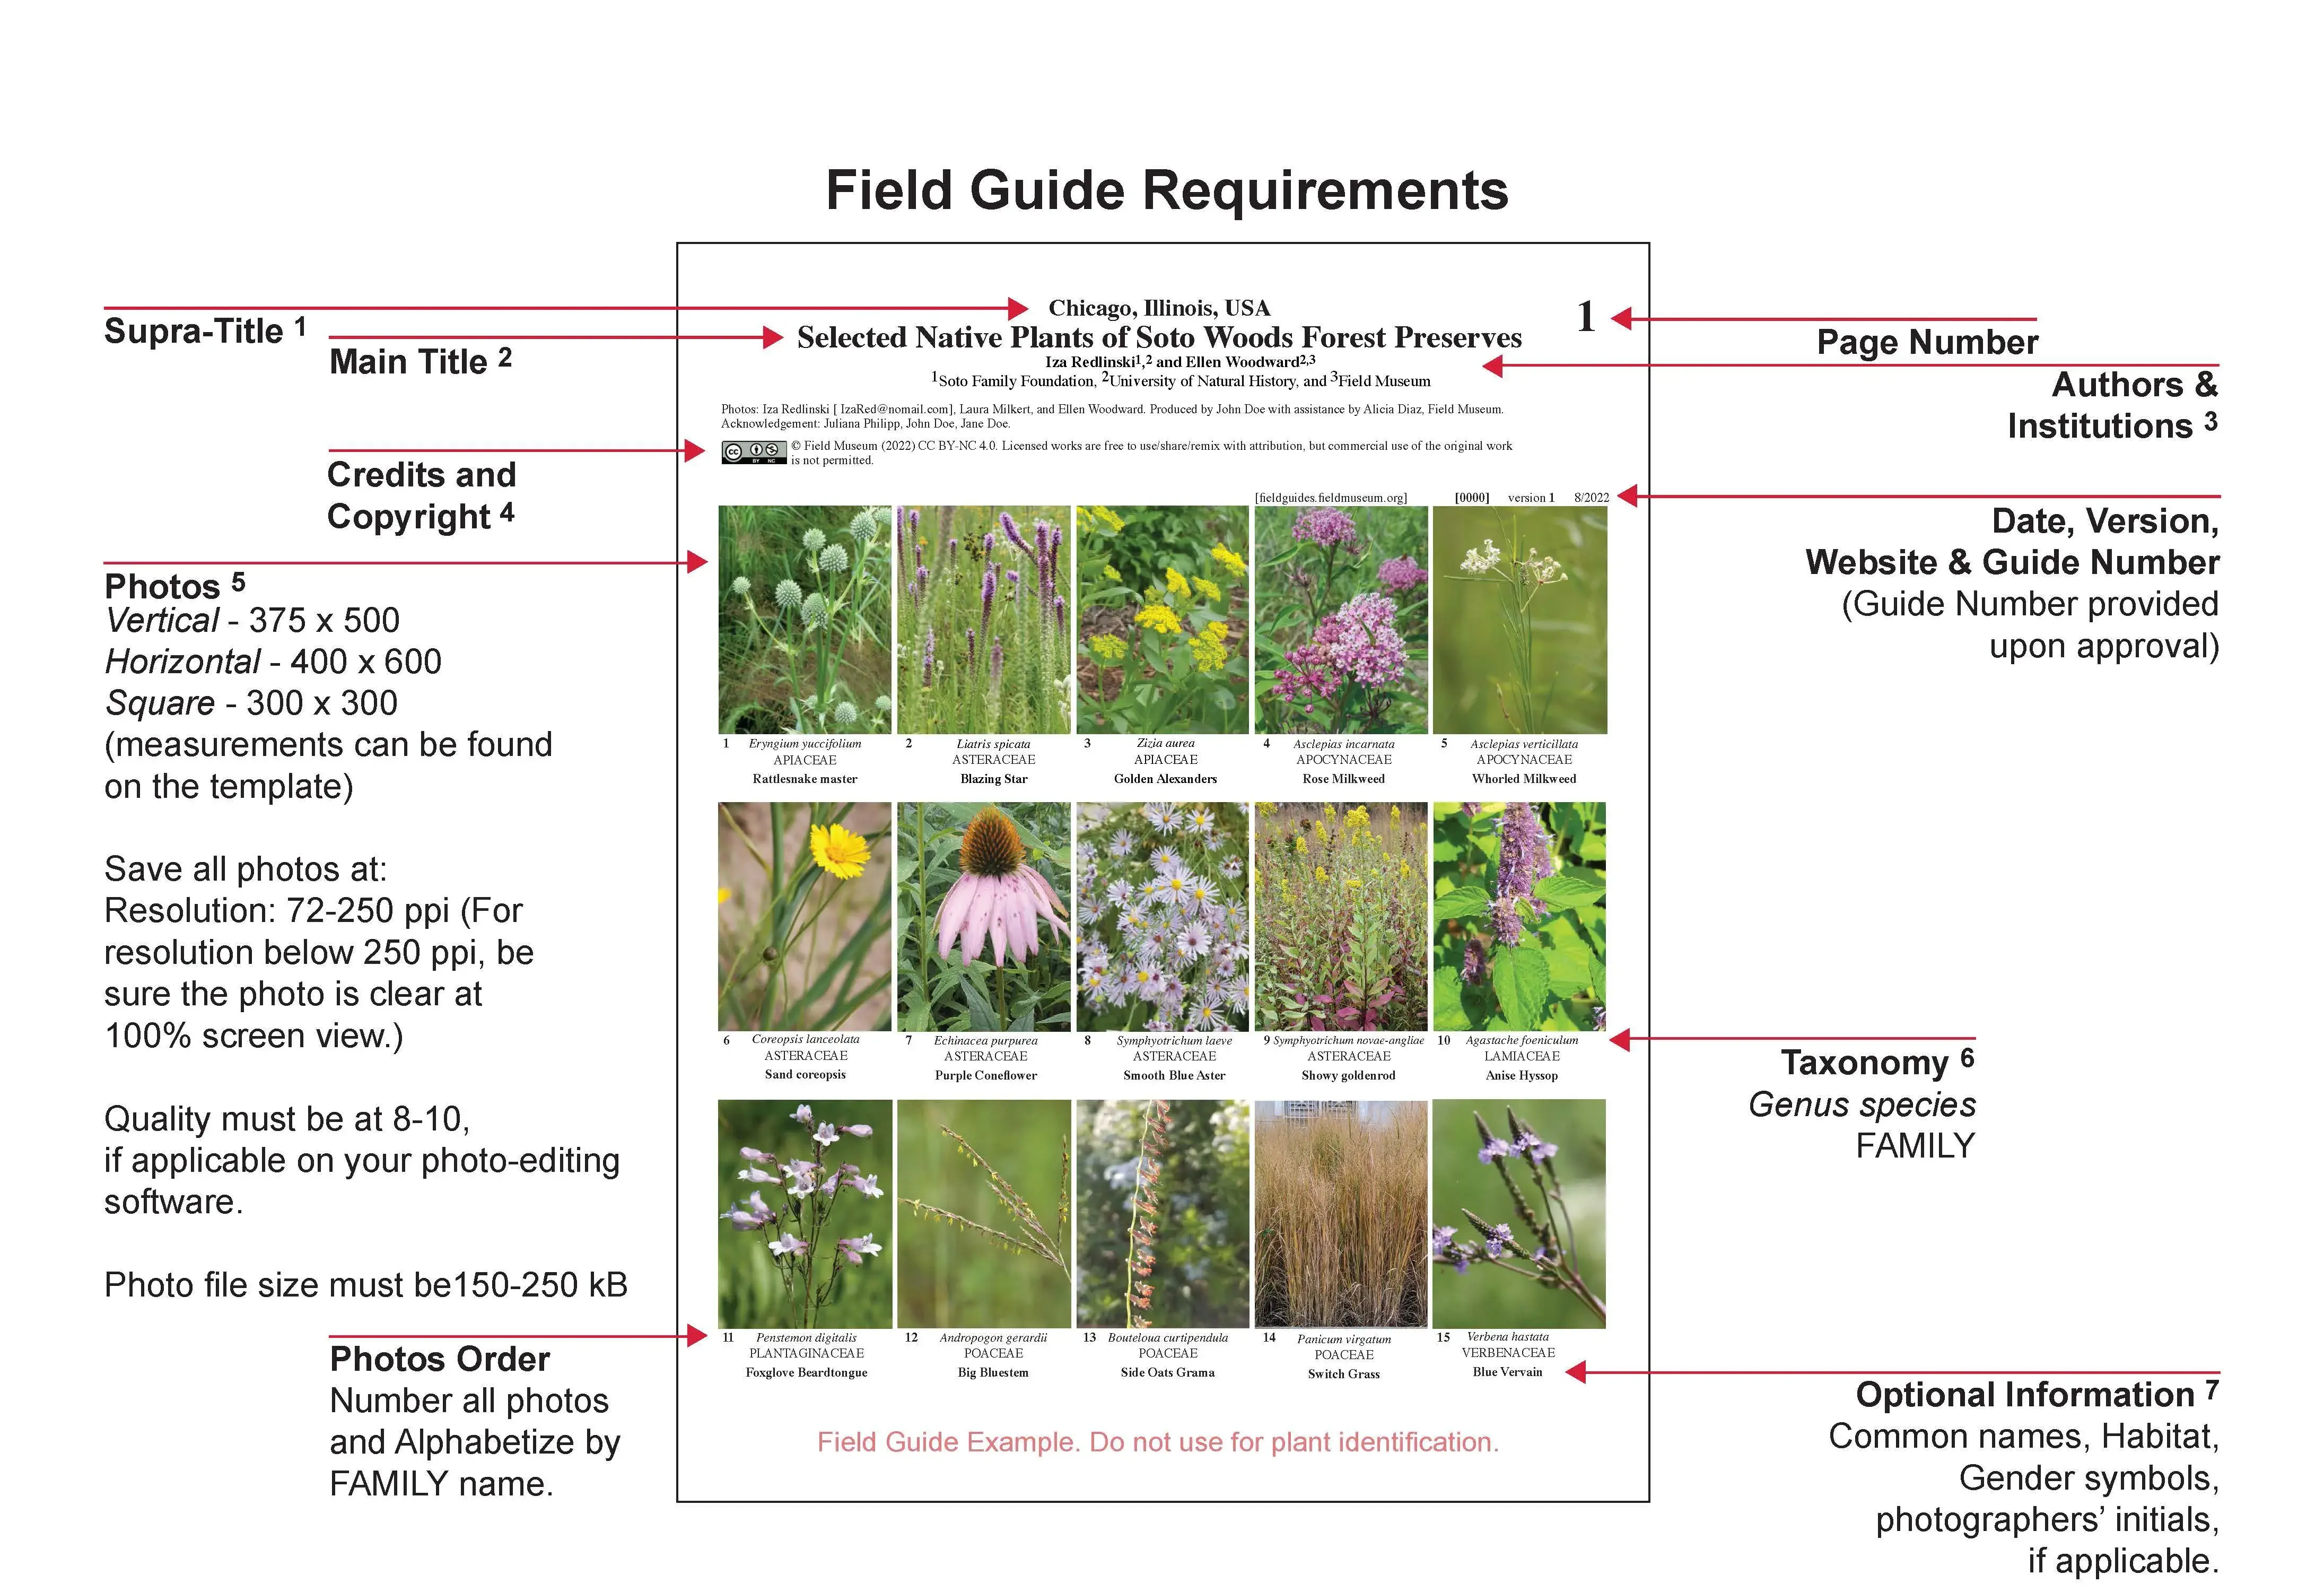
Supra-Title: This should include broader location information about your field guide. This may include city, state, and country.
Required Formatting: 13-15 point font size, bold.
Example: City, State, USA -- Chicago, Illinois, USA
More Examples:
Meseta del Somuncura, Provincia Río Negro, Patagonia, ARGENTINA Reserva Ecológica Cotacachi-Cayapas, Imbabura, ECUADOR
Main Title: This text should be short and describe the subject of the guide -- keywords can be emphasized in all caps, if applicable. Italicize scientific names if used in the title. The title should include the most specific location of your field guide.
Please use a title that specifies the content, i.e., not ‘Araceae of the Upper Amazon’ or ‘Araceae of Brazil’ when it is really ‘Araceae of Reserva Bruja.'
Required Formatting: 18-20 point font size, bold.
Example: (Organisms) of (specific locality or region), Selected Native Plants of Soto Woods Forest Preserves
More Examples:
Plantas Representativas del Bosque Protector Tanlahua SELECTED VASCULAR EPIPHYTES of Western Paraná Common BUTTERFLIES of the Chicago Region

Authors & Institutions: Give serious consideration to including a photographer or a taxonomist as an author if they have made a significant contribution to the guide. Guides with multiple authors/institutions will need numbers to associate the author with the corresponding Institution - use superscript.
Required Formatting: Author, 10-point font size with bold font. Institution names, 8-10 in regular font (not bold).
Example:
Iza Redlinski1,2 and Ellen Woodward2,3
1Soto Family Foundation, 2University of Natural History, and 3Field Museum
Here are examples of how to display authors' names:
a. One author, one institution (Note that superscript numbers are not necessary in this case):
Juliana Livian Lima de Abreu
Museu Paraense Emílio Goeldi, Coordenação de Botânica, Belém, PA.
b. Multiple institutions:
Ana Kelly Koch 1,2
1Instituto de Botânica, Núcleo de Pesquisa Orquidário do Estado, São Paulo, SP,2 Museu Paraense Emílio Goeldi, Coordenação de Botânica, Belém, PA.
c. Multiple authors, multiple institutions:
Juliana Livian Lima de Abreu1,3 , Vinícuis Martins Barbacena1, Bruno Martins De Mello1, Ana Kelly Koch 2,3, Jocasta Prado1, Maria de Queiroz Carneiro-Silva3, André Luiz de Rezende Cardoso3 & Anna Luiza Ilkiu-Borges3
1BIOTA Projetos e Consultoria Ambiental Ltda, Goiânia, GO, 2Instituto de Botânica, Núcleo de Pesquisa Orquidário do Estado, São Paulo, SP, 3Museu Paraense Emílio Goeldi, Coordenação de Botânica, Belém, PA.
d. Multiple authors, same institution (No need to add superscript numbers)
Ana Kelly Koch, Juliana Guimarães, Rayane Ribeiro
Instituto de Botânica, Núcleo de Pesquisa Orquidário do Estado, São Paulo, SP

Credits & Copyright:
This may include acknowledgments and assistance, recognition of photographers, and copyright. Copyright options are chosen in Submittable. Visit our Field Guide Permissions Page to learn about our Copyright options.
Please include
1. Appropriate acknowledgment of funding sources and other assistance
2. A permanent email address of the author(s) so that people who want to suggest corrections can contact the author first.
3. A key or legend for any abbreviations or symbols used in the text under the photos, preferably in bold.
4. Add your copyright options. Standard text is provided in the template.
Required Formatting: 8-point font size, regular (not bold). Use the following section titles: Photo: Produced by: Support: Acknowledgement: Legend: (If applicable)
Photos: Crop your photos before inserting them into the template. InDesign users can crop their photos within the program to fit the template. All images should be saved as “high-quality level 8 or 10” on your photo-editing software if applicable. To do so, crop your image and click “save as.” A JPEG Options box will pop up on your screen with quality options. A single PDF page is normally 2-4 MB in size.
Square Template - 300 pixels wide x 300 pixels heightHorizontal Template - 600 pixels wide x 400 pixels height
Large Horizontal Template - 800 pixels wide x 675 pixels height
Vertical Template - 375 pixels wide x 500 pixels height
Large Vertical Template - 675 pixels wide x 800 height
(measurements can be found on the template)
Save all photos at Resolution: 72-250 ppi (For resolution below 250 ppi, be sure the photo is clear at 100% screen view.) Photo file size must be 150-250 kB.
Your guide is more likely to be accepted if a) your photos are of high quality, b) the species are recognizable in this small format (the characteristics that define a specific specie should be easy to see in a small photo), and c) you follow our advice on choosing, optimizing, and cropping photographs.

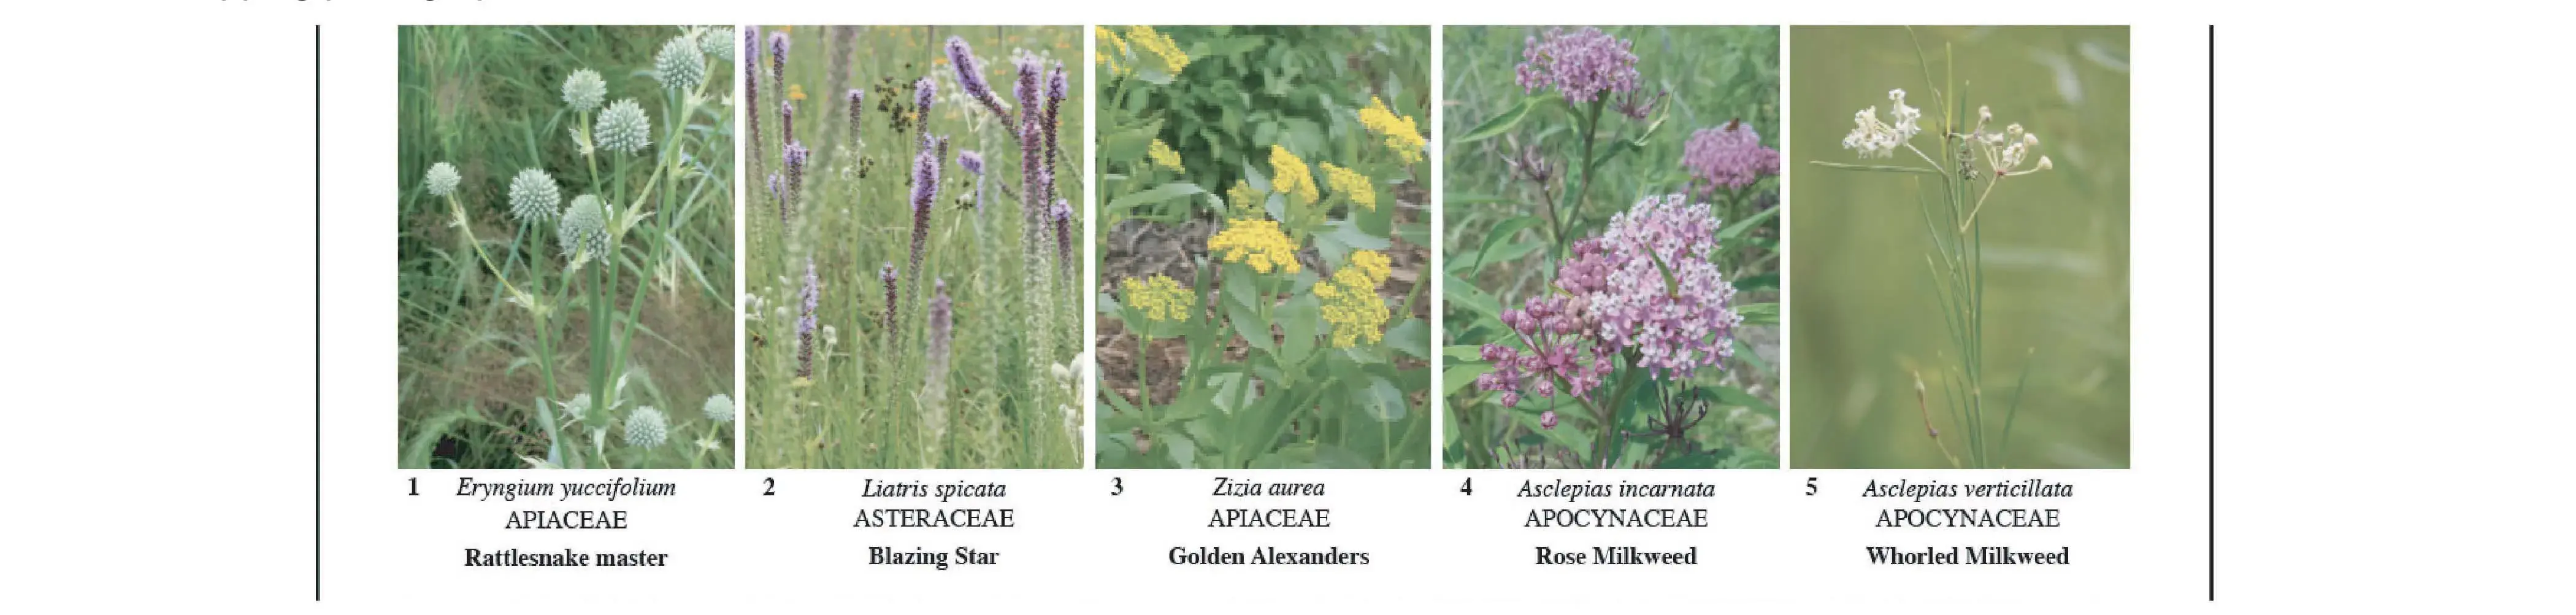
Taxonomy: This text occupies a tiny space and must be very brief. It may include one or more of the following: species name, higher taxa names, common names and habits. We recommend that species names be more conspicuous than other information in this field and sort into major taxonomic groups, and within these groups sort alphabetically by FAMILY, Genus, and Species.
Please ensure that taxonomic information is free of typographic errors and follows the international code of nomenclature rules. Scientific names [or Species names] are displayed as follows:
1.Biological names are in Latin and are written in italics.
2.The first word in the name indicates the genus, while the second word denotes its specific epithet.
3.The first letter of the first word is always written in capital, while the first letter of the specific epithet, i.e., the second word, is lowercase.
Required Formatting: 8 or 9 point font size, regular (not bold).
Example:
Eryngium yuccifolium
APIACEAE
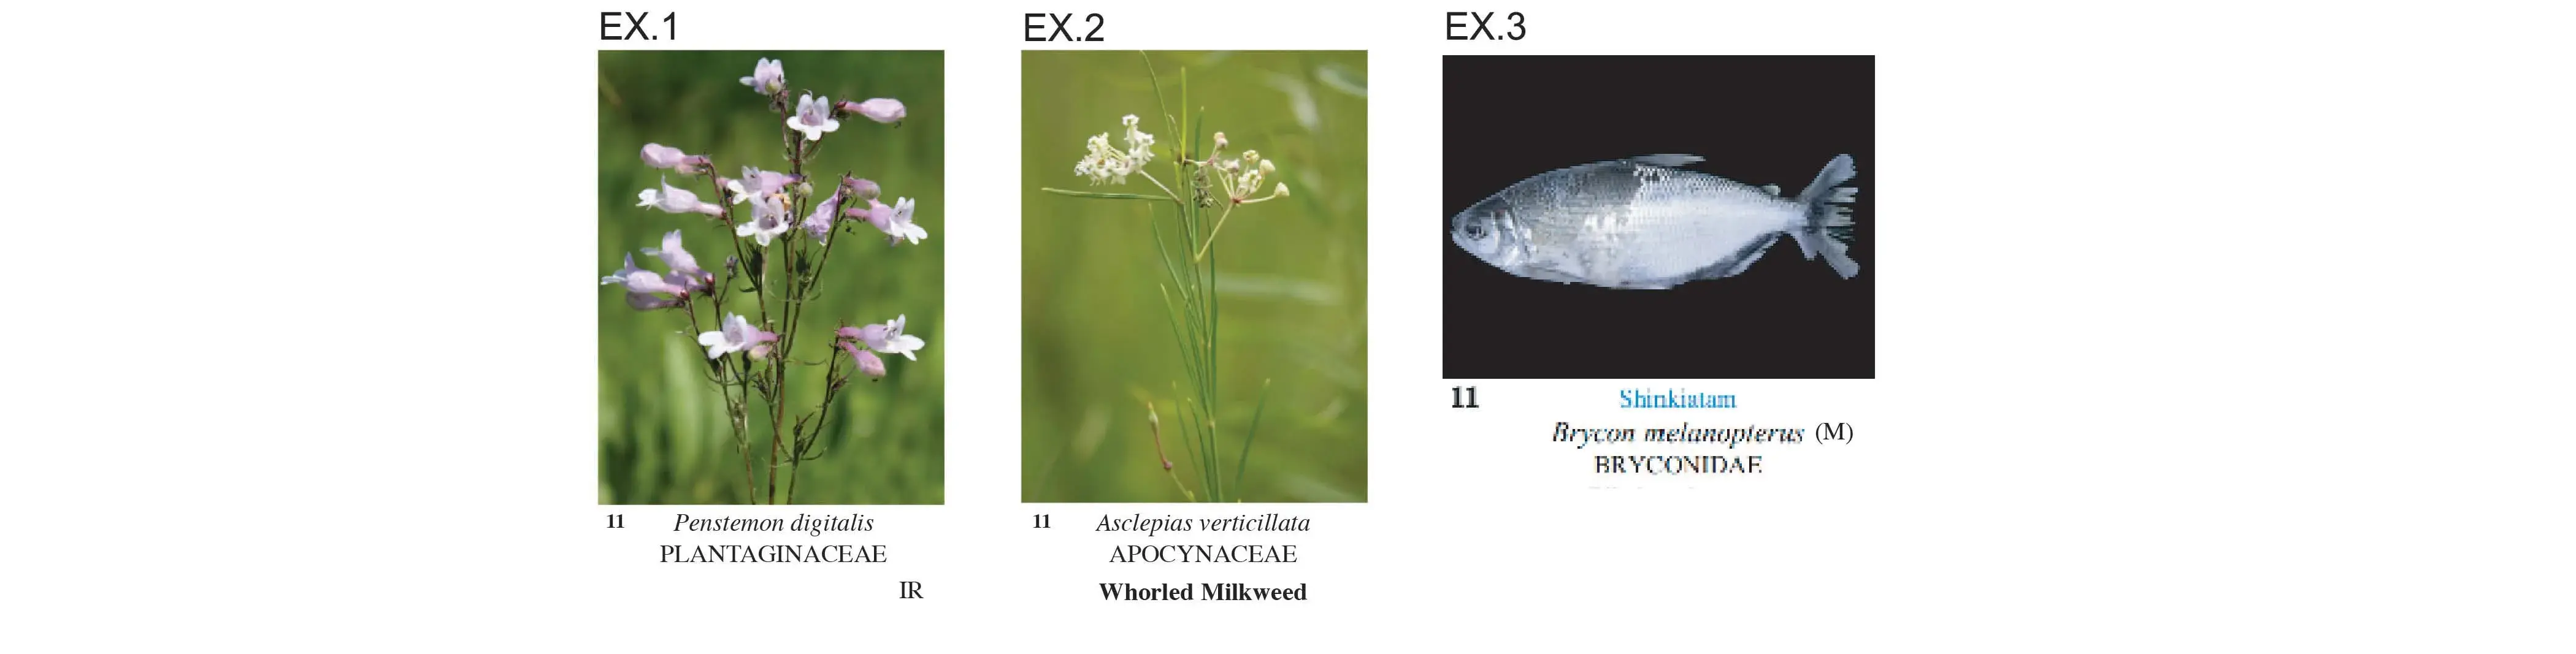
Optional Information: In addition to scientific information, you can add common names, photo credits, habitat, and gender symbols. Please provide a key or legend in the credits if you use symbols, initials, or abbreviations.
Required Formatting: 8-point font size, regular (not bold).
Examples:
Ex.1 Photo Credit with Photographers initials, Ex. 2 Common Names, Ex 3. Gender (represented as a symbol or letter).
Once you are done, follow the instructions on Submittable.
Do you want to learn more about Submittable? Go to the Frequently Asked Questions Page, “Submitting Your Guide For Review and Publication” section.